Grovenor Sidings, Railway Modelling Pages by Keith Norgrove
Home Page, Class 37, Warship, Layout, DMUs, Turntable,  Garratts.  

Wagon Compensation

by Keith Norgrove

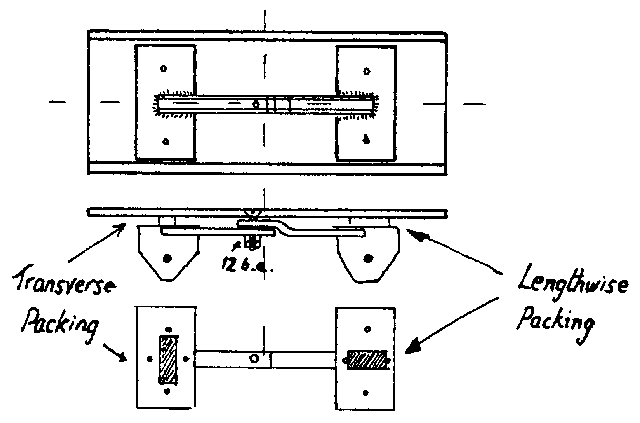
After trying the various methods that have been described recently, I was not very satisfied with any of them. The 3 point type with pivots gives a hard ride and a noticeable lack of symmetry. The type using 4 x 12ba bolts through the holes in the T.O.U. performs well but 12ba bolts are expensive and one hole slightly off centre ruins the axle alignment. Well, looking through some old magazines of the 50’s, I have found an article by John Langan describing a method which has proved highly successful.

  1. It uses only one 12ba bolt.
  2. It uses up all those scrap bits of rail not quite long enough for check rails.
  3. It is very quick and easy to install.
wiron.gif (6284 bytes)

Procedure is as follows:—

  1. Drill a hole in the floor, approximately on the longitudinal centre line but a few millimetres off the centre of the wheelbase.
  2. Tap the hole 12ba and screw in a 12ba screw from above.
  3. Take 2 of above mentioned scraps of rail, drill a 12ba clearance hole near one end of each.
  4. Crank the end of one rail so they fit together as illustrated.
  5. Lay one W—iron in place on a piece of heat resistant packing equal in thickness to the aircraft rubber packing.
  6. Drop the cranked rail over the screw and solder to the W—lron
  7. Repeat for second W—lron and straight rail.
  8. Replace packing by resilient rubber IS’d to top of W—lron.
  9. [IS’12, IS150, Loctite or similar cyano— acetate welding cement. But read the instruction carefully since this very effective liquid adhesive is also very effective in bonding human skin together. It is extremely dangerous in incapable hands, or when used by young children, but is nevertheless one of the best methods of joining substances, including metal, yet invented].

Back to Home Page

Copyright Keith Norgrove.
Last revised: August 27, 2003